"All art is quite useless" - Oscar Wilde
RSS

October 30, 2011

Autumn Candle Glass

Want to catch some cozy autumn feeling in a glass?


I have found this great idea on some crafting blog. Sadly I lost the link when my old laptop crashed and I couldn't find it again.

So today I took a walk through the beautiful autumn forests and collected some coloured leaves.


I really love those on the left because they are bi-coloured. Also, I noticed that you get the most beauitfully coloured leaves from very young trees.

Well then I took them home, washed and dried them, and started crafting.

 I thought I could simply attach them to the glass with mod podge, but the surfaces really didn't work well together. Too smooth.

 So first I applied a whole layer of mod podge to the glass and the leaves I wanted to use and let them dry. Then I applied another thin layer on the leaves and attached them to the glass, holding a hairdryer in my mouth, directed at the leaf, while I pressed it onto the glass with both hands. Must have looked hilarious.

It really was a rather tricky procedure. But I love the result.


 I applied like two thick layers of the mod podge on top and probably will apply another one tomorrow. I just want to make sure everything it absolutely airtight and I hope this will prevent the colours from fading and the leaves from drying.


The glass on a mirror.


I think the yellow and red also make for a nice Christmas decoration.
Follow me

Donkey Piñata Time!

I made a piñata! Yay!


I wanted to make one for some time now and last week I spontaneously decided to try it for a birthday. Since I had no experience whatsoever I decided on a rather simple design without any fancy extras such as limbs.

The inspiration was my favourite star model: Eselchen


All I used was a balloon, an IKEA catalogue (I didn't have regular newspaper D:), and acrylic colours.


For the glue I tried a simple recipe I found on the internet. One part flour, two parts water. Didn't work too well, so I added decoupage glue-lacquer to it and it worked just great.

I really wouldn't recommend shiny catalogue paper. Real newspaper is the best because it soaks through really fast and is very hard when the glue-mix is dried, but I had to make do with what I had at home.


I made about 5 - 7 layers, I think, and it had some stability in the end, but not as much as it would have had with newspaper. When everything is dry you can make the balloon pop.
But seriously, make sure it's dry, otherwise the air that is forced out by the explosion might blast a hole or two into the damn thing :D.

I used some paper to form the ears, painted them, and attached them to the painted "head" afterwards.

After the colour had dried I filled it with sweets
When I bought all that stuff the cashier asked me if I were preparing for Halloween... what a funny woman! I don't share my chocolate with strangers :p


I couldn't figure out an intelligent way to create a construction to hang it up on. But then again it's too cute to beat it with a stick anyway.
I have a tendency to make things that are too cute to throw away but too useless to keep. But in any case, you can use it as a vault for sweeeets and chocolate :D

"Am I not cute?"

Follow me

October 26, 2011

Anniversary Quilt

My very first quilt project was to be an anniversary quilt for my parents. I wanted it to be SO awesome, but it turned out to be harder and more time-consuming than I thought. It sure isn't perfect and I'm not really satisfied, but I think it is presentable and my parents were very happy about it - which was the intention really. So I didn't totally fail :) And I sure learned a lot.


This project was planned some time in advance and I worked on it over a long period of time with long breaks in between. So no picture tutorial, sorry. But the text will reveal some of the problems I had in the process and might be helpful for starters who don't want to make the same mistakes as I did.

Of course I first made a lot of sketches with elaborate quilting patterns until I realised that I should probably start with something simple. But even those rectangles didn't quite turn out as I had planned them.

Then I went to buy fabric. And believe me, quilting fabric and wadding for a 2x2m quilt is not quite cheap x_X But it was a special present, so I wanted to use good fabrics.
I think I screwed up the colour mix and pattern a bit, especially with that ochre-coloured fabric. Oh well...

Then I started to cut the rectangles.

Please, if you ever cut fabric for quilting.... use a template to draw the pattern onto the fabric, use a rotary cutter for cutting. I HAD a pattern, but missed out on the seam allowance, so I added that by guessing. Of course, it became irregular. And I didn't have a rotary cutter. Two mistakes I WILL NEVER MAKE AGAIN.

It could have saved me so much pain to just cut a new template, but I was too eager to start.
Damn you, enthusiasm!


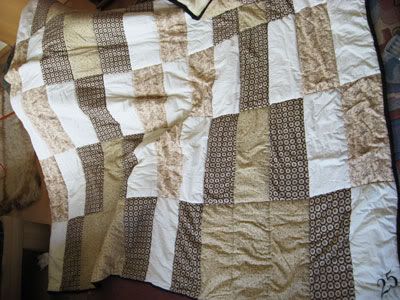
Here's the crumply quilt in all its mighty glory. After I had cut out all the rectangles, I sewed them together. The borderlines don't fit exactly because of my guessing work on the seam allowance. Meh.

Afterwards I ordered a very large and very warm and plushie microfibre blanket from ebay for the backing of the quilt. I adjusted all three layers - the backing, the wadding, and on top the.. well, top of the quilt, the patterned fabric. I secured them with saftey pins and started to sew all of it together.

First all horizontal lines, then all vertical lines. Of course always along the lines on the fabric, which didn't always work, but most of the times.

At the end it became quite difficult to fit everything under my sewing machine. And I'm glad about that walking foot I bought two years ago.


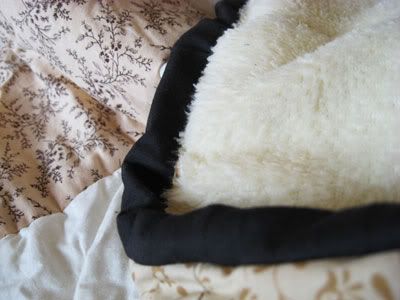
After I had sewn all the lines, only the borders were still open. That's when I discoevered I had to sew 50% of the binding by hand x_x That's about 8 meters!!!
Anyway, I found this tutorial incredibly helpful.
Since it couldn't be helped, I sewed the rest of the binding by hand. And surprisingly enough it took me only two long evenings. And was kind of satisfying... really.


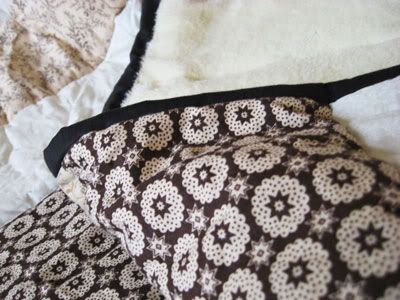
And the icing on the cake is the "25" I stitched into one corner of the quilt, which took me another two evenings. Without an embroidery frame. Again, something I won't do again.


Although the fabric is a little crumply around the edges, I still think the 25 turned out beautifully, I really like it.

Actually, I like the whole damn thing because its cozy and incredibly warm and it doesn't fall apart :'D

I sure will do more quilting projects now that I know which mistakes to avoid, but not until I bought a rotary cutter and a cutting mat. Seriously.

Follow me

More Papercraft: Gift Boxes and Pencil Box


I recently made two gift boxes for friends' birthdays. Actually, you can never have too many boxes, can you?
It's easy as pie and I used the same technique as with the cardboard drawer.


Here's what I used... default boxes and paper from the crafting store.

Before applying the paper I painted them with brown acrylic paint. I just thought it has a nicer look and texture.

Afterwards I really just cut out paper, glues it to the boxes with the glue-lacquer and occasionally added some fancy.


#1


#2


Duh... the lid has eight sides I made take a picture of the one where the ends of the paper strip meet... Yeah, that's me.


 Inside this one is some leftover and very nice petrol fabric and a kind of pocket watch on a necklace.


The second project was the pencil box. I had this one for ages, really. It was still fine, just needed a new look.


That's it. More papercraft sure to come!
Follow me

October 25, 2011

Penroll / Brushroll

Hey.
Here comes my little tutorial for sewing a penroll or a brushroll.
It's very nifty and cute as well. And the best: very easy to sew.


I settled for a plain black fabric on the one, and a fancy red fabric with black velvet on the other side.

At first, you have to cut two squares (or rectangles close to suqares) of your preferred size. Mine were about 30 x 30 cm long. Then you have to sew the left sides together as if you were making a pillow slip.
Then you turn your piece to the right side and iron it.
Now you decide what should be your outer and your inner colour for the roll.
My outer fabric is the red one.
Lay the piece on the ground so that you only see the inner side and fold it so that you have about 20 cm of your outer fabric now on the inner side.
Sew the edges.
Then you decide how large your pipes for the pens or brushes should be (I made different sizes) and you sew a straight line on the 20cm where the back (outer side) is on the front.
Nearly done. Just add a ribbon on one side so that you can tie the roll later.

Here is a visual instruction:


Have fun sewing!

Follow me